Sunday, February 27, 2011

Extract images from Word files

A few days back I was in need to copy an image from a MS-Word document so that I can add it somewhere else. I thought that I would be able to copy/paste the image in ctrl+c/ctrl+v way, but it didn't worked. So I tried a rather unorthodox way. Steps I took are as below:
  • Saved my .doc file as .docx file
  • Changed the extension to .rar
  • Extract this .rar file
  • I got folder hierarchy as below


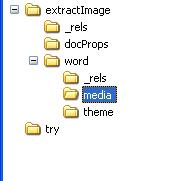
This folder hierarchy was made by extracting the rar file. Here you could see the media folder selected. Here you can find all the images in the word document. Thats it.

This trick also works for open office files.

Sunday, February 20, 2011

Creating a DNN module


Below are the steps for creating a DNN module:

  1. Install DNN starter kit, this will let you to automate many of the procedures which you had to perform manually like creating manifest file, folder hierarchy, etc. You can download DNN starter kit from below link:

  1. Now create a new web project in visual studio and select DotNetNuke Compiled Module option(as shown in below image)

  1. In the newly created project you will get below:
    1. 3 user controls
    2. Classes for interacting with database and holding business logic.
    3. Files for installing and uninstalling database scripts while installing/uninstalling module.
    4. Manifest file (with extension .dnn)
    5. A documents folder containing files to tell you what to do next.
  2. Now right click the project name in solution explorer and select properties option there.
    1. Here under ‘Application’ tab set Assembly name and default namespace as desired.
    2. Under ‘Build’ tab select output path to bin folder of your DNN installation. This will save you effort to manually copy & paste .dll file from your module’s project folder to dnn website’s bin folder.
    3. Also you can place XCOPY command in “Build Events” tab to automatically copy ascx controls from your module’s project folder to DNN desktop module folder. For example in this case it will be somewhat like below:
XCOPY “/*.ascx” “” /q /y
Remember to place this on post build event only so as to avoid wrong controls from reaching your main folder.


(Above two steps are not mandatory, they are just to speed up your process by automating a few steps)

  1. By default, this template gives “YourCompany.Modules.” as default namespace for all classes, change it appropriately in all user controls, provider classes and controller classes.
  2. By default, view control has view control has a DataList control added to it, remove it and add your custom code. In this sample module I am going to show meaning of a word entered.
  3. Create logic as required in controls and controller classes and build your project.
  4. Now edit .dnn file and edit it for name, version and files.
  5. Now you need to register your newly created module with your dnn installation.
  6. For this create a new folder under desktop modules folder in your DNN installation and copy paste below files into it:
    1. App_LocalResources, whole folder
    2. ASCX files
    3. SQLDataProvider files
    4. Uninstall. SQLDataProvider files
    5. Module.css
  7. Now login as host user and go to Module Definition section under host menu, click on “create new module” option.
  8. There will be a drop down saying “Create Module From:”, select manifest in it.
  9. Now select folder you created for new module from the drop down list, after doing so “Resource” drop down will get populated with manifest file name.
  10. Now click “Create Module” link.


That’s it your module is ready to be placed on any page.

DotNetNuke Error Domain Name Windows XP Does Not Exist In The Database

A few days back while installing DNN 5.5.1 I got following error message "DotNetNuke Error  Domain Name Windows XP Does Not Exist In The Database" repeatedly. 

I tried everything from tweaking web.config to reinstalling ASP.NET but error kept on occurring. After this I was convinced that this is a database permission error. So I reinstalled database as below and there it goes, my problem got resolved.

Steps I followed are as below:

  • Create a DotNetNuke database in SQL Server.


  • Under the main Security node (not the one under the database you just created), right-click on Logins and select New Login


  •  Create an account that uses SQL Server authentication and provide a password.


  • In the database you created, select Security then right-click on Users and select New User.


  • Enter the account you created and select db_owner for both "Schemas owner by this user" and "Database role membership".  Click OK.


I used below reference link for this:

http://www.adefwebserver.com/DotNetNukeHELP/DNN4_DevelopmentEnvironment/DNNDevelopmentWindowsVista.htm

Hope this helps you guys also.

About Me

My photo
Delhi, India
Fun, music, travel and nature loving, always smiling, computer addict!!